Step By Step Deploy NopCommerce In Local IIS Server
Published on February 5, 2013
It is always better idea to deploy production code in local IIS host before deploying it in live server. If your developing asp.net application in visual studio you will use IISExpress to run the application. Most of the time IISExpress may not show those error which will be shown by IIS. For example when i run the nopCommerce in visual studio it worked properly but when i deployed it in Local IIS i fond a unknown error “Could not load type ‘System.ServiceModel.Activation.HttpModule…”

What is NopCommerce? Those who don’t know NopCommerce is open source free Online stores application(just like flipcart,ebay). It is built on ASP.NET MVC. There are many features in NopCommerce. NopCommerce also support wide range of plug-ins. You can create your own plug-ins also. You can found more details about nopcommerce at //www.nopcommerce.com/ Deployment methods You can Deploy NopCommerce in two way 1)Tools provided by NopCommerce(*.bat) 2)Using Visual studio. First method is very easy to implement. Second method need some extra work.
1)Deploying using NopCommerce tools
1)Assuming you already download NopCommerce with Source(At the time of writing this post nopCommerce_2.80_Source.rar is the latest version). You can download NopCommerce with source at //www.nopcommerce.com/downloads.aspx
2)Extract nopCommerce_2.80_Source.rar at your desired location. I am using F:\DotNetProjects.
3)The extracted folder contains below items.
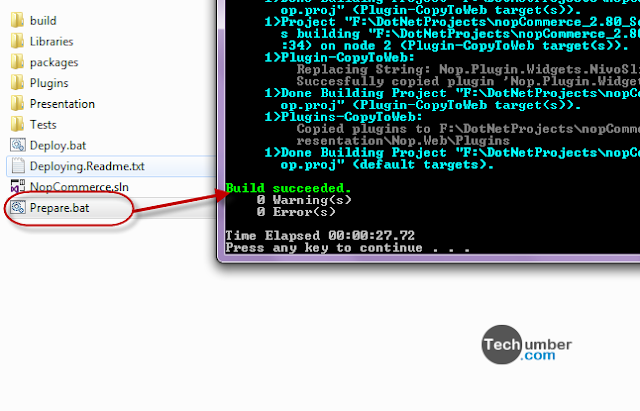
 4)In that folder Prepare.bat, Deploy.bat are the deployment tool given by NopCommerce.
5)First Run prepate.bat it will display bunch of text in command prompt and finally Build success message.
 6)Now Run Deploy.bat again it will show you bunch of text in command prompt and finally Build success message. If you observe a new folder called Deployable is created automatically. This is our production code we need to deploy in Live Server.
 7)Before we deploy it in live server we will deploy it in local IIS. Now Just go to you iis manager.
 8)Now expand the items in your left sidebar. Right click on Default Web Site and select Add Application form the menu.
 9)Enter details like below. Physical path field must be point to your Deployable folder.
 10)Now open your broser and enter //localhost/nop. If you got the error “Could not load type ‘System.ServiceModel.Activation.HttpModule’…” (don’t panic) I will explain how to resolve it later in this tutorial.
 11)If there is no error it will redirect you to //localhost/nop/install folder where you need to enter details like admin email,password, db connection details and click install.
 12)If everything is ok NopCommerse Will install successfully.
Error1:Could not load type ‘System.ServiceModel.Activation.HttpModule’ … Problem Fix
At step 10 in above process you may get this error.
Could not load type ‘System.ServiceModel.Activation.HttpModule’ from assembly ‘System.ServiceModel, Version=3.0.0.0, Culture=neutral, PublicKeyToken=b77a5c561934e089
 If you got this error you can resolve it by using simple tool “aspnet_regiis.exe”.
Just go to C:\Windows\Microsoft.NET\Framework64\v4.0.30319 (path may different for 32 bit pc)in your command prompt. Run the the tool like this. “aspnet_regiis.exe -iru” this will execute some command and the problem should fixed.
 ERROR2:Setup failed: An error occurred while creating the database: CREATE DATABASE permission denied in database ‘master’. error. fix
If you got this error there are different alternative you can fix this error. But I will explain most simple one only.
1)Run NopCommerce.sln under nopCommerce extracted folder(Refer step 2).
2)Run the NopCommerce Application (ctrl+f5). 3)It will prompt you to enter db details(refer step 11). Enter details as shown in step 11 and click install.
4)This time you wont face any problem (as i told earlier at beginning).
5)No go to F:\DotNetProjects\nopCommerce_2.80_Source\Presentation\Nop.Web\App_Data (may different in your pc) and copy InstalledPlugins.txt,Settings.txt to F:\DotNetProjects\nopCommerce_2.80_Source\Deployable\nop_2.80\App_Data(this is our Deployable folder)
6)Now Go to //localhost/nop.
7)If it asked for db details enter exact details you entered before.
8)Voila! you successfully installed NopCommerce.
2)Deploying nopCommerce using Visual Studio 1)Go back to your to Visual studio where you open nopCommerce solution and build the solution. 2)Right click on Nop.Web click publish. 3)This will prompt you through publish web wizard Enter details like Publish Method:File System,Physical path 4)Now right click on Nop.Admin and publish with sub-directory as /Admin under same directory you selected in previous step. 5)copy all files you found under /admin/bin to /bin. 6)Now copy copy InstalledPlugins.txt,Settings.txt text to add_data folder(Just follow steps i explained in Errror2 section of this post). 7)That’s it everything is great now. 8)Now follow steps form 7 to 11 in deploying using nopcommerce tools.
**Note:**It’s always better to use NopCommerce tool method than using visual studio method.