Create Twitter Like Follow And Unfollow With Jquery
Published on October 18, 2012
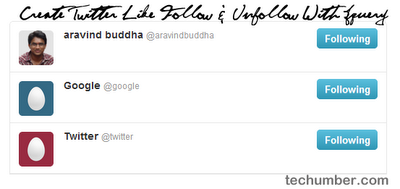
Today in this post I will show you how to create twitter like follow and unfollow using jQuery framework. I used some css styles from twitter bootstrap framework to style the buttons. Have a look at the demo below for better understand.

We will create the following files. —index.html —style.css —script.js
index.html
<div class="content">
  <div class="item">
    <a href="https://twitter.com/aravindbuddha">
      <img class="avatar" src="img/aravind.png" />
      <strong class="name">aravind buddha</strong>
      <span class="username ">@aravindbuddha</span>
    </a>
    <span class="button following">Following</span>
  </div>
  <div class="item">
    <a href="https://twitter.com/aravindbuddha">
      <img class="avatar" src="img/small.png" />
      <strong class="name">Google</strong>
      <span class="username ">@google</span>
    </a>
    <span class="button following">Following</span>
  </div>
  <div class="item">
    <a href="https://twitter.com/aravindbuddha">
      <img class="avatar" src="img/smallred.png" />
      <strong class="name">Twitter</strong>
      <span class="username ">@twitter</span>
    </a>
    <span class="button following">Following</span>
  </div>
</div>
This is just simple html here we take 3 divs with iteam class. style.css
.content {
  background-color: white;
  border: 1px solid #e8e8e8;
  -webkit-border-radius: 5px 5px 0 0;
  overflow: hidden;
  width: 520px;
  margin: 0 auto;
}
a {
  text-decoration: none;
  outline: 0;
}
.item {
  position: relative;
  min-height: 51px;
  padding: 9px 12px;
  border-bottom: 1px solid #e8e8e8;
}
.avatar {
  width: 48px;
  height: 48px;
  -webkit-border-radius: 5px;
  -moz-border-radius: 5px;
  border-radius: 5px;
  position: absolute;
  top: 12px;
  left: 12px;
}
.name {
  font-weight: bold;
  color: #333;
  margin-left: 62px;
}
.username {
  direction: ltr;
  unicode-bidi: embed;
  font-size: 12px;
  color: #999;
  line-height: 18px;
}
.button {
  float: right;
  text-align: center;
  min-width: 70px;
  padding: 5px 7px;
  color: white;
  text-shadow: 0 -1px 0 rgba(0, 0, 0, 0.25);
  font-size: 13px;
  font-weight: bold;
  line-height: 18px;
  text-shadow: 0 1px 0 rgba(255, 255, 255, 0.5);
  cursor: pointer;
  border-radius: 5px;
}
.follow {
  color: #333;
  background-color: whiteSmoke;
  background-image: -webkit-gradient(linear, 0 0, 0 100%, from(white), to(#e6e6e6));
  background-image: -webkit-linear-gradient(top, white, #e6e6e6);
  background-image: -o-linear-gradient(top, white, #e6e6e6);
  background-image: linear-gradient(to bottom, white, #e6e6e6);
  background-image: -moz-linear-gradient(top, white, #e6e6e6);
  background-repeat: repeat-x;
  border: 1px solid #bbb;
  border-color: rgba(0, 0, 0, 0.1) rgba(0, 0, 0, 0.1) rgba(0, 0, 0, 0.25);
  border-color: #e6e6e6 #e6e6e6 #bfbfbf;
  border-bottom-color: #a2a2a2;
  -webkit-border-radius: 4px;
  -moz-border-radius: 4px;
  border-radius: 4px;
  filter: progid:dximagetransform.microsoft.gradient(startColorstr='#ffffffff', endColorstr='#ffe6e6e6', GradientType=0);
  filter: progid:dximagetransform.microsoft.gradient(enabled=false);
  -webkit-box-shadow: inset 0 1px 0 rgba(255, 255, 255, 0.2), 0 1px 2px rgba(0, 0, 0, 0.05);
  -moz-box-shadow: inset 0 1px 0 rgba(255, 255, 255, 0.2), 0 1px 2px rgba(0, 0, 0, 0.05);
  box-shadow: inset 0 1px 0 rgba(255, 255, 255, 0.2), 0 1px 2px rgba(0, 0, 0, 0.05);
}
.following {
  background-color: #49afcd;
  background-image: -webkit-gradient(linear, 0 0, 0 100%, from(#5bc0de), to(#2f96b4));
  background-image: -webkit-linear-gradient(top, #5bc0de, #2f96b4);
  background-image: -o-linear-gradient(top, #5bc0de, #2f96b4);
  background-image: linear-gradient(to bottom, #5bc0de, #2f96b4);
  background-image: -moz-linear-gradient(top, #5bc0de, #2f96b4);
  background-repeat: repeat-x;
  border-color: #2f96b4 #2f96b4 #1f6377;
  border-color: rgba(0, 0, 0, 0.1) rgba(0, 0, 0, 0.1) rgba(0, 0, 0, 0.25);
  filter: progid:dximagetransform.microsoft.gradient(startColorstr='#ff5bc0de', endColorstr='#ff2f96b4', GradientType=0);
  filter: progid:dximagetransform.microsoft.gradient(enabled=false);
}
.following:hover {
  text-shadow: 0 -1px 0 rgba(0, 0, 0, 0.25);
  background-color: #bd362f;
  background-image: -webkit-gradient(linear, 0 0, 0 100%, from(#ee5f5b), to(#bd362f));
  background-image: -webkit-linear-gradient(top, #ee5f5b, #bd362f);
  background-image: -o-linear-gradient(top, #ee5f5b, #bd362f);
  background-image: linear-gradient(to bottom, #ee5f5b, #bd362f);
  background-image: -moz-linear-gradient(top, #ee5f5b, #bd362f);
  background-repeat: repeat-x;
  border-color: #bd362f #bd362f #802420;
  border-color: rgba(0, 0, 0, 0.1) rgba(0, 0, 0, 0.1) rgba(0, 0, 0, 0.25);
  filter: progid:dximagetransform.microsoft.gradient(startColorstr='#ffee5f5b', endColorstr='#ffbd362f', GradientType=0);
  filter: progid:dximagetransform.microsoft.gradient(enabled=false);
}
above code for classes .button , .follow ,.following ,.following:hover I used properties from twitter bootstrap . There it nothing great about them they are just cross browser compatible gradient buttons. script.js
$(document).ready(function() {
  //to change the text
  $('.following').hover(
    function() {
      $(this).text('Unfollow');
    },
    function() {
      $(this).text('Following');
    },
  );
  //for toggle the class following/follow When click
  $('.following').click(function() {
    $(this)
      .toggleClass('following follow')
      .unbind('hover');
    if ($(this).is('.follow')) {
      $(this).text('Follow');
    } else {
      //binding mouse hover functionality
      $(this).bind({
        mouseleave: function() {
          $(this).text('Following');
        },
        mouseenter: function() {
          $(this).text('Unfollow');
        },
      });
    }
  });
});
1)When hover on the button change the text to Unfollow, On unhover change it back to Follow. 2)When Click on the follow button change the class from following to follow and unbind hover event. 3)If the follow class already appled then change the text to Follow. 4)Else bind the events mouseleves and mouseenter(its re-enables the hover event)
Thats it! If you like it you can help me by sharing it.