Basic Understanding Of Source Control Using TortoiseSVN
Published on February 8, 2013
If you are a developer or you want to be a developer, Source Control(also known as version control) is the one of the impotent skill you need to add your skill set along with your other skill. If you are a asp.net developer you may have .net,c#,wcf skill set. If Your are a PHP developer you may have php,wordpress,yii skill set. But both ASP.NET developer as well as PHP developer need to work with there source. So they need to know how to do Source Control. Today’s post i will explain how to user TortoiseSVN to for source control.

TortoiseSVN
TortoiseSVN is a one of the famous and widely used source control tool. It is a open source tool. You can use it free of cost. TortoiseSVN has so many features. But today’s post i will explain only about how to create Repository(Center Source Bank), How to create checkout clients to download, upload source code and make changes to the source.
In order to explain I am creating Repository and svnCheckout client on same computer. But generally we will use central server in LAN or Web Repository like SourceForge.net to deal with source control.
Creating Repository
Repository is something like common source Bank. Who ever have permission to access it can download,upload there own version to this repository. Now lets see how to create repository at local system. I am assuming you already downloaded and installed TortoiseSVN. If not you can download TortoiseSVN from tortoisesvn.net/downloads.html
1)Create a New folder in your PC and Name it as Repo_Project1(In some companies use there own central server. Generally they name the repository folder as Repo_ASPNET_Project1, here ASPNET technology name).
2)Now right Repo_Project1 from the popup menu select “TortoiseSVN”>“Create Repository here” and click OK.
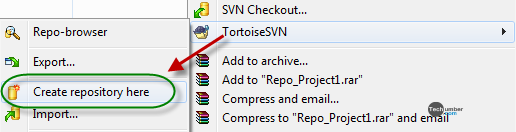 3)The Central repository created successfully.
Creating SVN Clients.
Now it is time to create svn clients to explain exactly how clients share Source code. Generally we call it as “Working Copy”. we will create two clients.
1)Create a New Folder some where else and name it as Project1_svnClient1.
2)Now right click on Project1_svenClient1 and select SVN Checkout.
3)The Central repository created successfully.
Creating SVN Clients.
Now it is time to create svn clients to explain exactly how clients share Source code. Generally we call it as “Working Copy”. we will create two clients.
1)Create a New Folder some where else and name it as Project1_svnClient1.
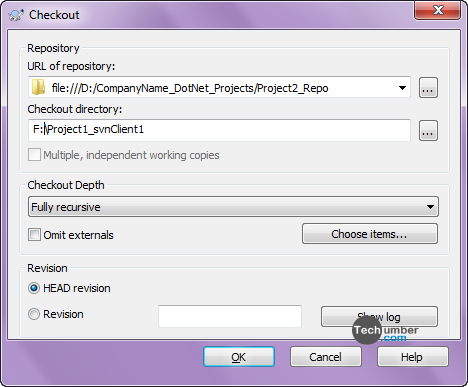
2)Now right click on Project1_svenClient1 and select SVN Checkout.
 3)This will prompt you to enter check out properties like URL of repository(You need to enter or select the repository your have created earlier) and click ok.
 4)You will notice a green tick mark with represents that you have created a new svn client and updated successfully.
 5)If you see in side of that folder you will only see .svn(if you chance you explorer setting to see hidden folder)
6)Now add a new file “repotest.txt” and add some text in it.
7)Now go back and right click on Project1_svenClient1 and select “SVN Commit..” form the menu.
5)If you see in side of that folder you will only see .svn(if you chance you explorer setting to see hidden folder)
6)Now add a new file “repotest.txt” and add some text in it.
7)Now go back and right click on Project1_svenClient1 and select “SVN Commit..” form the menu.
 8)This will pop up a window like below, there you can see your newly added file repository.txt. select that file and click ok
 9)New file successfully added to repository. To test wither the repo updated, we need to create other svn client.
Creating Second SVN Client
1)Now create new folder some where else and name it as Project1_svnClient2.
2)Follow the steps 2 to 5.
3)If you open and see inside the Project1_svnClient2, You will notice repotest.txt already added to the project.
4)That means repotest.txt sucessfully addes to the Repo_Project1.
Source Controlling
Now to under stand we will create a new source file called “hellow.cs” under Project1_svnClient2, Comment changes(as we did in step 8). Now go back to Project1_svnClient1 right click on Project1_svnClient1 and select “SVN Update..“.
 If you open and see the folder you will notice “hellow.cs” added here.
This is the way you need to work with different version of source. Here we assume only two developer so we created only two svnClients. But generally in companeys the number will me more.
If you participate open Source development the number of developer will be in thousands.
That’s it! hope you like it!.
If you open and see the folder you will notice “hellow.cs” added here.
This is the way you need to work with different version of source. Here we assume only two developer so we created only two svnClients. But generally in companeys the number will me more.
If you participate open Source development the number of developer will be in thousands.
That’s it! hope you like it!.